Create an adorable Personalized Easter Bunny Basket to fill with Easter goodies that can be used as decor or as a gift!

Hippity, hoppity, Easter is on it's way! This wooden Personalized Easter Bunny Basket is a great piece to use as decor for your own home, or for gifting to a friend or family member. Inside of the basket can be filled with all kinds of treats and other Easter surprises. This project is a lot of fun make using the xTool S1 laser cutting machine, and there are so many ways you can personalize the little Easter egg for your own home or for gifting.
To make your own Personalized Easter Bunny Basket, you will need these supplies:
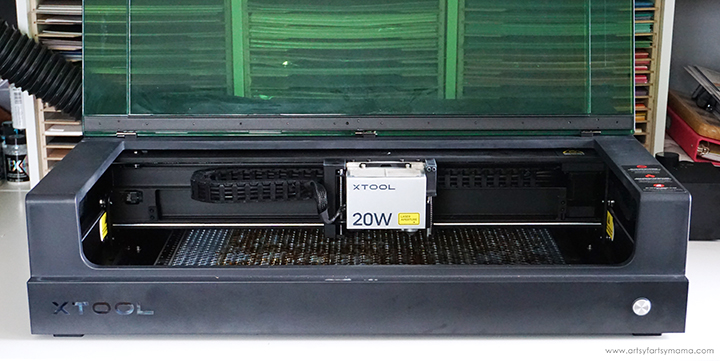
- xTool M1 or xTool S1 laser cutting machine
- Personalized Easter Bunny Basket Design (personal use only)
- 3mm Basswood
- Acrylic Paint
- Paint Brushes
- Strong Adhesive
- Clamps (optional)
- White Acrylic Paint Marker
*Save extra 15% off on xTool selected materials: AFFMTRS15
Printables and cut files from Artsy-Fartsy Mama are for personal use only. This means you may use these for your own creations, but you may not sell them. If you'd like to share this project digitally, share a link to this post/website only. Do not share a direct link to the printable/cut file.

Upload the Easter Bunny Basket design into xTool Creative Space. When you upload an SVG design, you need to make sure each part of the design is set for cutting, scoring, and/or engraving. For this project, everything in red needs to be cut, black needs to be engraved, and blue needs to be scored.
There is an Easter egg in the design to personalize with the recipient's name. If you load it right into XCS, the text form is ready to go. I used the Ingredients font for the name on my egg. Adjust the size so that it fits onto the center egg, and then make sure it's set to be engraved.

Place a piece of 3mm basswood into the xTool S1 machine. Manually pull the laser box with your hand so that the red "+" is located on the material - it doesn't have to be centered. In XCS, you will see "Distance (mm)" in the right menu bar. Click on the target icon to the right of that space, and the machine will automatically measure your material.
*For more details on how to complete this step, be sure to check out my review of the xTool S1 Laser Machine!
Make sure that the design elements are within the marked bounding box in XCS, and then click the green "Process" button in the bottom right corner to proceed to cutting the project.

After removing the wood pieces from the machine, I would highly recommend cleaning the soot away from around the edges of the wood using a Magic Eraser or baby wipes to prevent making marks all over your hands and workspace.

I recommend using acrylic paints to paint the bunny basket. I used white, pink, black, and teal, as well as some Extreme Glitter holographic paint for extra sparkle! You will also need a medium-sized paint brush.

Cover the feet, tail, front side of the bunny face piece, arms and back side of the base bunny face piece, side and bottom pieces, and both sides of the back bunny piece with white acrylic paint. Depending on the type of wood and paint you use, you may need to add more than one coat. Just make sure to allow each coat of paint to dry completely before adding another one on top.

Next, cover the nose and foot pads (shaped with score lines) with a light pink paint. It's perfectly fine, actually recommended, to paint a bit outside the lines on these shapes. The cutouts will align with the score lines, but this way you won't have any white peeking through the openings. Allow the paint to dry completely.

Apply a thin line of adhesive to the back of each foot, and then place them on the front bunny face piece, lining up the openings in the feet with the score lines on the layer beneath. I highly recommend having a set of small clamps on-hand to keep the pieces in place while the adhesive sets.
Speaking of adhesive, I always use something that's strong, dries quickly, and is clear. The first two are for obvious reasons, but prefer clear adhesive because it's not as noticeable if any of it seeps out from between the wood pieces.

Don't be scared, but this is what the base bunny face looks like when all of the areas are painted! I used the light pink for the ears, nose, and tongue. Then I painted the eyes and mouth black. The whiskers are silver, and then I painted the arms white and added small circles to the eyes. Allow the paint to dry completely.
For some extra sparkle, I added some of the Extreme Glitter paint to the ears, eyes, nose, foot pads, and tail.
Ignore the scored feet - this was a test piece I cut earlier and put them in the wrong spot!

- Lay the back bunny piece down on your workspace.
- Add a small line of adhesive in between the notches on the side edge of one of the side pieces.
- Align the notches with the back piece, and press it into place.
- Hold the piece in place for a minute or two with medium pressure to give the adhesive time to set.
- Repeat the process to add the other side piece.
- Add a small line of adhesive on either side of the notch on the bottom piece.
- Align the notch with the back piece, and press it into place.
- Hold in place for a minute or two with medium pressure.

Add lines of adhesive next to all of the notches on the edges of the pieces, then place the scarily-painted bunny face base piece on top and align the notches. Carefully press it into place.
Once everything is in place, place something heavy (like a book) on top of the box/basket. Give the adhesive plenty of time to set (refer to the packaging).

Next, apply adhesive to the back of the front bunny piece. Place it on top of the basket, lining up the bottom edge and ears. Use clamps to hold it in place until the adhesive sets completely.

Last, but not least, turn the basket over and stick the tail on with adhesive. Hold it in place until the adhesive sets.

While waiting for the adhesive to set, paint the personalized Easter egg! I covered Avery's piece in a coat of teal paint and allowed it to dry completely.

Once the paint dries, use a white acrylic paint marker to fill in the name. You may need to use more than one coat for full coverage, so just make sure each coat dries completely before adding another one on top.


This mini bunny basket is such a fun piece of Easter decor and makes a great gift! The inside box area measures about 3x3x3 inches once assembled, so you can easily pack it to the top with candies and other holiday surprises.

This mini Personalized Easter Bunny Basket is such a fun and festive project to make with the xTool, and I had a lot of fun putting it together! As always, I would love to see what you're making! Share your creations on Instagram, Facebook, or leave a comment/photo on the project pin on Pinterest! #AFMCrafts.
Don't forget to Pin, Like, and Share!


