
Share the love with a laser cut Wooden Valentine's Day Mailbox packed with treats!

Valentine's Day is all about sharing the love, and this Wooden Valentine's Day Mailbox is the perfect way to do it. It's a great piece to use as decor for your own home, or for gifting to a friend or significant other. The door on the front of the mailbox can open, so you can pack this piece with all kinds of treats and other Valentine surprises. You can even drop a love note into the slot on top! This project is a lot of fun make using the xTool S1 laser cutting machine, and there are so many ways you can customize it for your own home or for gifting.
To make your own Wooden Valentine's Day Mailbox, you will need these supplies:
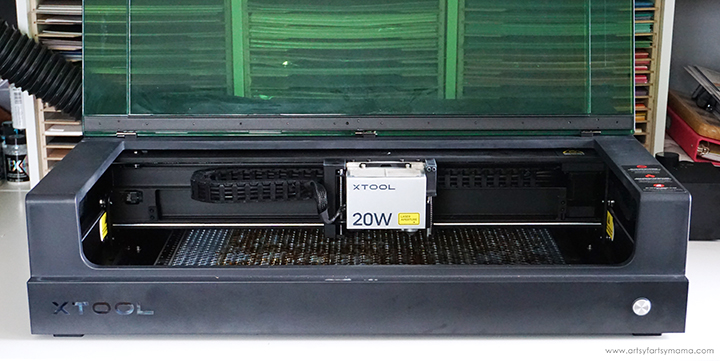
- xTool M1 or xTool S1 laser cutting machine
- Valentine's Day Mailbox Design
- 3mm Basswood
- Acrylic Paint
- Paint Brushes
- Strong Adhesive
- Clamps (optional)
*Save extra 15% off on xTool selected materials: AFFMTRS15

Upload the Valentine's Day Mailbox design into xTool Creative Space. When you upload an SVG design, you need to make sure each part of the design is set for cutting, scoring, and/or engraving. For this project, everything in red needs to be cut, black needs to be engraved, and blue needs to be scored.
*I loved the base design from this Valentine's Day Mailbox Design, but made some changes to the decorations on it to make it fit in with my own decor.

Place a piece of 3mm basswood into the xTool S1 machine. Manually pull the laser box with your hand so that the red "+" is located on the material - it doesn't have to be centered. In XCS, you will see "Distance (mm)" in the right menu bar. Click on the target icon to the right of that space, and the machine will automatically measure your material.
*For more details on how to complete this step, be sure to check out my review of the xTool S1 Laser Machine!
Make sure that the design elements are within the marked bounding box in XCS, and then click the green "Process" button in the bottom right corner to proceed to cutting the project.
After removing the wood pieces from the machine, I would highly recommend cleaning the soot away from around the edges of the wood using a Magic Eraser or baby wipes to prevent making marks all over your hands and workspace.

Paint all of the larger mailbox pieces with acrylic paint (I used FolkArt Matte Festive Fuchsia). Depending on the color and type of paint, you may need to add multiple coats for full coverage. For best results, make sure to let each coat dry completely before adding another on top.
The back of the side pieces of the mailbox will show when assembled, so I recommend painting the back side of those pieces. The rest only need the front sides covered.

While those pieces are drying, paint the smaller detail pieces of the mailbox with acrylic paint. I covered all of mine in white. For both the larger and smaller envelope pieces, I lined the engraving with an extra fine black acrylic paint pen to help the detail stand out.

This IS a Valentine project, after all, so there are plenty of hearts that need some color! At first, I did a mix of both turquoise and light pink, but in the end, I ended up not liking it as much. So, I decided to paint all of the hearts with turquoise acrylic paint instead! The hearts are pretty small, so the painting and drying goes by pretty fast.

Once the paint has dried completely, it's time to attach the details to the mailbox pieces. Luckily, the design has score lines in place so that all you have to do is match up the lines with the pieces, almost like placing a sticker! Use a small amount of adhesive all over the back of the wood pieces. I find it easier to apply it using a toothpick for those smaller pieces.
Because wood isn't always perfectly flat, I highly recommend having a set of small clamps on-hand to keep the pieces in place while the adhesive sets.
Speaking of adhesive, I always use something that's strong, dries quickly, and is clear. The first two are for obvious reasons, but I like using clear adhesive because it's not as noticeable if any of it seeps out from between the wood pieces.

Here you can see the score lines a bit better for placing the small hearts on the mailbox side pieces. I just added a small drop of adhesive to the center of each scored heart, and then carefully pressed the wood heart on top of it, making sure they are lined up.
Give each of the pieces plenty of time for the adhesive to set. You don't want anything shifting when you try to assemble the mailbox (trust me).

When you're ready to assemble, lay all of the pieces out in one area so that you don't have to get up to go find them. At times, I felt like I was building a gingerbread house, some pieces tipping over while I was over sorting out the next pieces.
Here's how I assembled my mailbox:
- Lay one side mailbox piece (either one) face-down on your workspace. Set aside for now.
- Add a small line of adhesive in between each notch on the bottom edge of both the front and back pieces.
- Take the bottom piece, and align the notches with the front and back pieces, and press it into place.
- Hold the pieces in place for a minute or two with medium pressure to give the adhesive time to set.
- Add small line of adhesive between the front, bottom and back notches on side mailbox piece. Don't add adhesive along the top notches yet.
- Carefully tip the front/bottom/back pieces on its side, and line the notches up with the side piece and press the pieces into place. Hold in place with medium pressure for a few minutes.
- Next, add small drops of adhesive around the notches around the top of the side piece. One at a time, place the thinner pieces into place around the top. The piece with the cutout will go in the center. The pieces will likely tip over as you press them in, so use your other hand to carefully hold them in place.
- Turn the opposite side piece over, and add small lines of adhesive in between ALL of the notches.
- This part's a little tricky, so try be patient. Place the side piece on top, and fit each of the notches into place.
- Once everything is in place, place something heavy (like a book) on top of the mailbox. Give the adhesive plenty of time to set (refer to the packaging).


Now it's time to attach the door to the front of the mailbox. Yes, my friends, this is a working door! The small rectangles with the rounded edge on one side are the key to attaching the door. Place the mailbox door "tabs" (at the top) into the hole of each of those rectangles. Add some adhesive to the front and back of the squared pieces. Carefully slide the rectangles into the openings on the front of the mailbox, and leave the adhesive to set.
I know it's tempting, but don't test the door until the adhesive has set. If you do, the pieces can come out and you'll have to put it back together again.


This mailbox is such a fun piece of Valentine's Day decor! It measures about 5x4x8 inches once assembled, so you can easily pack it to the top with candies and other holiday surprises.

The mailbox would also make a great gift for friends or a significant other. There is a slot at the top that is the perfect place to add a sweet note to go along with any other surprises placed in the box.
This Wooden Valentine's Day Mailbox is such a fun and festive project to make with the xTool, and I had a lot of fun putting it together! As always, I would love to see what you're making! Share your creations on Instagram, Facebook, or leave a comment/photo on the project pin on Pinterest! #AFMCrafts.
Don't forget to Pin, Like, and Share!


