
These wooden Boo Bucket Earrings are going to bring back the nostalgia this Halloween!

Getting one of McDonald's Boo Buckets was always a special Halloween tradition for us as kids. To bring back that nostalgia this Halloween, I decided to make some adorable Boo Bucket earrings out of wood using my the xTool S1 laser cutting machine. Making this handmade jewelry is a lot of fun to to assemble, and would definitely be a great gift for Halloween!
New to laser cutting? Be sure to check out how to get started with the xTool S1 Laser Machine!


The crafting possibilities are endless when it comes to using the xTool S1 laser cutting machine, and it's actually very easy to use! Once you have one of these, the hardest thing you'll have to do is decide what to make with it. If you want to learn more about how this incredible machine works, be sure to check out my complete xTool S1 review.
To make your own Halloween Boo Bucket Earrings, you will need these supplies:
- xTool M1 or xTool S1 laser cutting machine
- Halloween Boo Bucket Earring Design
- 3mm Basswood
- Acrylic Paint or Stain - black
- Acrylic Paint Markers - green, white, orange
- Clear Sealant or UV Resin
- Adhesive
- 6 Earring Posts
- 6 10mm Jump Rings
- 2 Earring Hooks
- Jewelry Pliers
*Save extra 15% off on xTool selected materials: AFFMTRS15
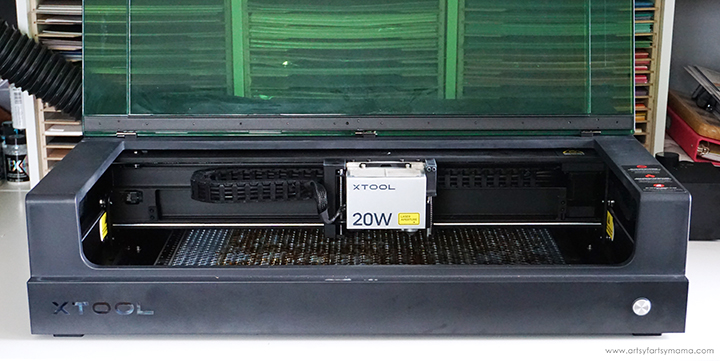
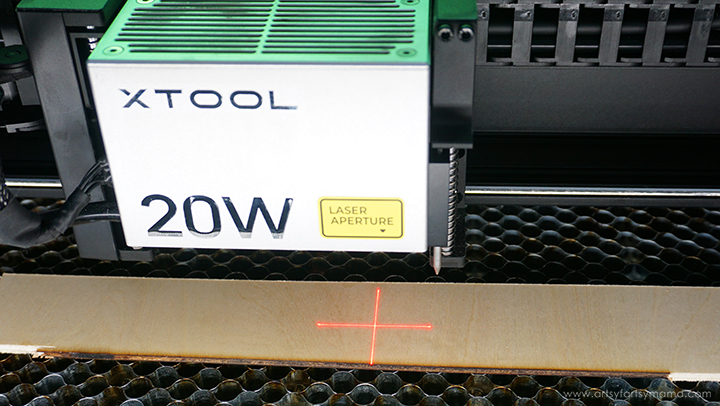
Place a piece of 3mm basswood into the xTool S1 machine. Manually pull the laser box with your hand so that the red "+" is located on the material - it doesn't have to be centered.
In XCS, you will see "Distance (mm)" in the right menu bar. Click on the target icon to the right of that space, and the machine will automatically measure your material.
For more details on how to complete this step, be sure to check out my review of the xTool S1 Laser Machine!
Upload the Halloween Boo Bucket Earrings design into xTool Creative Space. When you upload an SVG design, you need to make sure each part of the design is set for cutting, scoring, and/or engraving. For this project, everything in red needs to be set to cut, and the purple needs to be engraved. In the right menu bar, change the material setting to 3mm Basswood.
*Feel free to adjust the size of the boo buckets to suit your preferred earring length. The pieces I cut were about ¾" tall.
Make sure that the earring design elements are within the marked bounding box in XCS, and then click the green "Process" button in the bottom right corner to proceed to cutting the project.
After removing the earring pieces from the machine, I would highly recommend cleaning the soot away from around the edges of the wood using a Magic Eraser or baby wipes to prevent making marks all over your hands and workspace.

Cover all of the pieces with a thin layer of black acrylic paint or stain (like Unicorn Spit). This darkens the engraving in one swipe of the brush, plus it gives you a solid color layer to build on. Allow the paint to dry completely.
Next, use acrylic paint markers (or a brush and acrylic paint) to add color to each of the boo buckets. I recommend a bright orange for the pumpkin, a green apple shade for the witch, and white for the ghost. I put some pieces next to each other so that you can get an idea of the painting process. Lighter colors, like white and orange, will need more coats of paint than something like green. Just make sure to let each coat of paint dry completely before adding another on top.

To give the earrings a finished look, dome the top with a coat of UV resin. Use a toothpick to cover the entire surface with resin, making sure to get it right to the edges. Pop any surface bubbles with alcohol, and then cure under the UV light. I would also recommend covering the opposite side of the earrings.

First, I'll show you how to assemble the smaller stud earrings because they are just so easy! Turn the boo bucket studs over, and attach an earring post to the center using strong adhesive. Cover the entire back of the earring with UV resin to give it a more permanent hold and cure with the UV light.

These Boo Bucket studs may be small, but they do make a statement! They are so fun to wear, and you can rotate days of wearing them all spooky season long. I especially love how nostalgic they make me feel!!

If you want to wear all three Boo Buckets at once, the dangles are just what you need! Each earring needs three jump rings and one earring hook. You can put either the witch or the pumpkin at the top of the stack. Open the jump rings with jewelry pliers and hook them through the top hole of each piece.
Attach the earring hook to the ring on the top piece (pumpkin) and close it to keep in in place. Then, hook the ring attached to the top of the second piece (witch) to the bottom of the top piece (pumpkin) and close the ring. Last, but not least, attach the ring on the ghost to the bottom of the second piece (witch) and close the ring. Repeat the same process for the second earring, and then they are ready to wear!
It's obviously no secret how much I absolutely LOVE these wooden Halloween Boo Bucket Earrings! I am so excited to make and share more of these earrings all spooky season long with friends and family. As always, I would love to see what you're making! Share your creations on Instagram, Facebook, or leave a comment/photo on the project pin on Pinterest! #AFMcrafts
Looking for more Halloween craft inspiration?
Check out this collection of OVER 100 creative Halloween craft ideas!!
Don't forget to Pin, Like, and Share!


