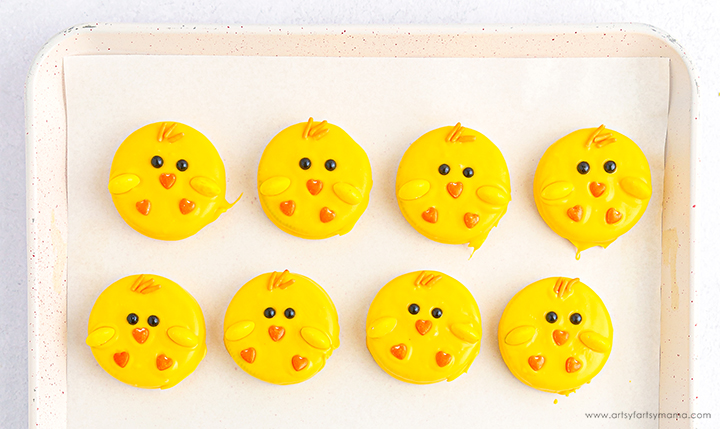
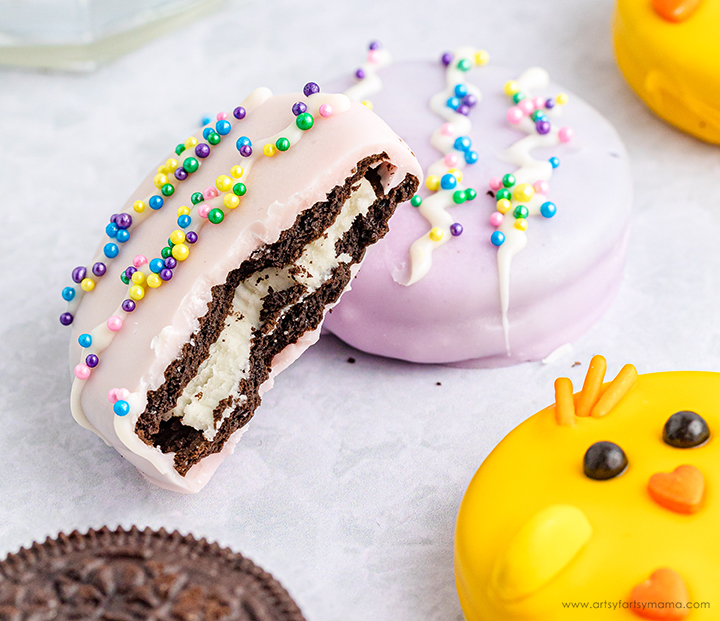
These no-bake Oreo Easter Cookies are a quick and easy Easter treat to make with the kids!

These dipped Oreo cookies are a simple and sweet Easter treat that the kids will love to help with! They only require a few ingredients, and there's absolutely no baking involved. These festive Chick and Easter Egg cookies are not only adorable, but are a great addition to an Easter basket, holiday parties, and for sharing as a sweet gift that everyone will love!

These Oreo Easter egg and chick cookies only require a few simple ingredients: Oreos, white chocolate melting wafers, food coloring*, M&Ms, and sprinkles. There's no baking required with this recipe, and it's so easy to make that even the kids can help!!
*Make sure to use an oil-based food coloring. Other types of food coloring may cause the melting wafers to seize and thicken up quicker.

Add in a few drops of yellow food coloring and stir until evenly distributed. Add more coloring as needed until you get a bright yellow "chick" color. Alternatively, you can use the pre-colored candy melts if you don't want to use food coloring.


After decorating all of the chick cookies, leave them on the baking sheet for the chocolate to completely harden. You can either let the cookies sit at room temperature for 20-30 minutes, or make it faster by putting the baking sheet in the fridge.

To make the Oreo Easter Chick Cookies: Melt white chocolate using a double boiler over low heat or microwave in a bowl on a low or defrost setting in 30 second increments. Stir often to allow even heating.

Servings: 24 Cookies


Place the Oreos, one at a time, onto a fork and dip it into the melted wafers until completely coated. Gently tap the fork on the side of the bowl to allow excess chocolate to drip off. Place the dipped cookie onto the prepared baking sheet.
*No matter which method you use for melting, be sure to use low heat. Melting with high heat can cause the melts to seize, which makes the chocolate thick and clumpy. Needless to say, it will make it very difficult to get an even coating on the cookies.

When it comes to assembling the chicks, it’s best to work in batches of 3-4 cookies at a time so the chocolate doesn't set up before you get to them. Add all of the faces first: Use 2 black sugar pearl sprinkles for eyes, and then center an orange heart sprinkle right below for the beak.
Once the faces are on, add two orange heart sprinkles toward the bottom for the feet. At the top, place a few orange jimmies in the center for hair. Lastly, place one half of a yellow M&M on both sides at angles for the wings.
*If you don't want to use the black pearl sprinkles, you can use candy eyes or pipe melted black candy melt eyes instead.


Add in a few drops of pink or purple food coloring (split the chocolate into separate bowls and create multiple colors) and stir until evenly distributed. Add more coloring as needed until you get a pretty pastel shade. Alternatively, you can use the pre-colored candy melts if you don't want to use food coloring.


After decorating all of the Easter egg cookies, leave them on the baking sheet for the chocolate to completely harden. You can either let the cookies sit at room temperature for 20-30 minutes, or make it faster by putting the baking sheet in the fridge.
Place the Oreos, one at a time, onto a fork and dip it into the melted wafers until completely coated. Gently tap the fork on the side of the bowl to allow excess chocolate to drip off. Place the dipped cookie onto the prepared baking sheet.
*No matter which method you use for melting, be sure to use low heat. Melting with high heat can cause the melts to seize, which makes the chocolate thick and clumpy. Needless to say, it will make it very difficult to get an even coating on the cookies.

When it comes to assembling the eggs, it’s best to work in batches of 3-4 cookies at a time so the chocolate doesn't set up before you get to them. Place some of the white melted chocolate into a small piping bag and snip a tiny piece off the end.
Drizzle lines of chocolate onto the Oreos. Immediately top with spring nonpareil sprinkles before the chocolate sets.


Oreo Easter Egg + Chick Cookies
Prep Time: 45 minutes
Chill Time: 15 minutes
Chill Time: 15 minutes
Ingredients:
- 24 Double Stuf Oreo cookies
- 3 10oz white chocolate melting wafers
or use pre-colored candy melts instead - Oil-based food coloring - yellow, pink, and purple
- 16 black sugar pearl sprinkles
- 8 pieces yellow M&Ms, cut in half
- 24 orange heart sprinkles
- 24 orange jimmies sprinkles
- Spring nonpareil sprinkles
Oreo Easter Chick Cookie Directions:
- Line a baking tray with parchment paper and set aside.
- Melt 1 cup of white chocolate melting wafers in a double boiler over low heat or microwave on low or defrost in 30-second intervals. Stir often until completely melted and smooth.
- Add a few drops of yellow food coloring to create a vibrant "chick" shade of yellow.
- Dip one Oreo at a time into the melted chocolate using a fork. Gently tap to remove excess chocolate and place it on the prepared baking tray.
- Immediately place two pearl sprinkle eyes onto the Oreo, and then place an orange heart sprinkle just below for the beak. Add two orange heart sprinkles at the bottom edge for feet, 3 orange jimmies sprinkles at the top for hair, and then add one half of a yellow M&M on each side for the wings.
- Repeat with the rest of the Oreos, working in small batches of 3-4 cookies at a time.
- Allow the coating to fully set at room temperature for at least 15 minutes or speed up the process in the refrigerator before enjoying.
Oreo Easter Egg Cookie Directions:
- Line a baking tray with parchment paper and set aside.
- Melt 1 cup of white chocolate melting wafers in a double boiler over low heat or microwave on low or defrost in 30-second intervals. Stir often until completely melted and smooth.
- Add a few drops of pink or purple food coloring to create a pastel shade(s). Split the chocolate into separate bowls to create multiple colors.
- Dip one Oreo at a time into the melted chocolate using a fork. Gently tap to remove excess chocolate and place it on the prepared baking tray.
- Add some of the melted white chocolate into a piping bag and trim the end off. Drizzle lines of chocolate on top of the Oreos to resemble Easter egg designs.
- Immediately top the melted chocolate with spring-colored nonpareil sprinkles.
- Repeat with the rest of the Oreos, working in small batches of 3-4 cookies at a time.
- Allow the coating to fully set at room temperature for at least 15 minutes or speed up the process in the refrigerator before enjoying.
Tips:
- Store cookies at room temperature in an airtight container for 7-10 days, or refrigerate for up to 2 weeks.
- Variations: Use any flavor of Oreo cookies, or change things up with other circle-shaped cookies.

These Oreo Easter Egg + Chick Cookies are always a hit at parties, and kids love finding them in an Easter basket as a surprise from the Easter Bunny! Not only are the cookies adorable, but they taste great, too!! If you decide to give this recipe a try, I'd love to hear all about it! Please share your creations on Instagram, Facebook, or leave a comment/photo on the project pin on Pinterest!
If you like this recipe, don't forget to Pin, Like, and Share!


