Capture the beautiful colors of fall in a set of Resin Fall Leaf Coasters!

One of my favorite things about fall is changing leaves. We have a tradition of driving up the mountains to see all of the gorgeous colors and then stopping to have a picnic. The leaves on one of the trees in our neighborhood is already starting to change, so I grabbed a few leaves to encapsulate in resin as coasters. I love how they turned out! Using resin is such a fun way capture a moment of fall to keep forever on our coffee table.

Before putting them in resin, leaves and other plants need to be dried first. I put these leaves between two paper towels and then placed 3-4 heavy books on top. After a few days, the leaves were completely dried, flattened, and ready for resin! Be sure to handle them gently, because they will be brittle.
Instead of using paper towels, you could also bury the leaves in silica gel for a couple of days. If you are on a quicker timeline, you can use silica in the microwave to dry flowers and leaves faster.

Now that the leaves are ready, it's time to make some coasters! Here are the supplies you'll need:
*Save 10% on resin supplies when you shop ETI with code AFM

When working with resin, be sure to protect your workspace, work in a well-ventilated area, and wear disposable gloves and mask.
Prepare about 1 ounce per coaster of EasyCast Clear Casting Epoxy according to package directions. Pour in equal parts of resin and hardener to the mixing cup. Slowly stir the resin mixture together with a stir stick for two minutes. Pour the resin into a clean mixing cup and mix again with a clean stir stick for another few minutes. If you still see ethereal-like streaks through the resin, keep mixing until it becomes clear.
Pour one ounce of resin into each coaster mold. Pop any bubbles that rise to the top using a heat gun or by blowing through a straw. You could also lightly spritz the molds with 91% alcohol to remove surface bubbles.
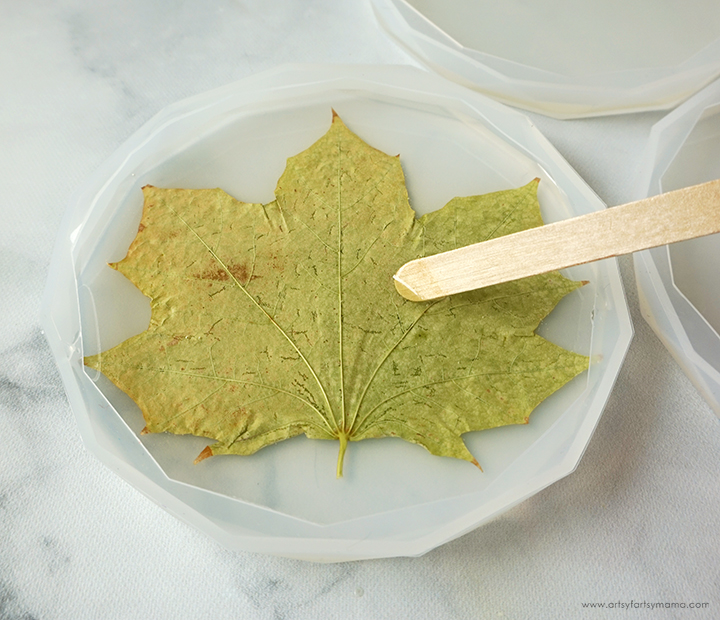
Carefully place a leaf face-down into the resin, putting the top end in first at an angle. Use a stir stick to lightly push the leaf down into the resin and to work any air bubbles out that are stuck underneath. You can also use the stick to adjust the leaf position so that it's centered in the coaster mold.

For some extra sparkle, I decided to add some gold foil flakes. The pieces come out of the jar in a variety of sizes. I put one piece into the resin, and then broke it into small pieces using a toothpick. Then I spread the pieces out evenly around the leaf.

Leave the resin to cure in an undisturbed, well ventilated area for at least 4 hours. Be careful not to touch it, or you will leave fingerprints!

Prepare about 1-2 ounces per coaster of EasyCast Clear Casting Epoxy according to package directions and mix the same way as before. Add in a little bit of fine gold glitter to the mixture and stir it in well until combined. I accidentally added a little too much, but it still looks pretty good!
Fill each coaster mold to the top with resin. Pop any bubbles that rise to the top using a heat gun or by blowing through a straw. You could also lightly spritz the molds with 91% alcohol to remove surface bubbles.

Carefully remove the coasters from the molds and admire your work! Remove any over-poured resin with scissors. Sand down edges, if necessary, and re-seal them with clear spray sealer.

I am absolutely in LOVE with these coasters! They will look great with any type of decor, and will certainly be a conversation piece. It's amazing to see the detail of the leaf through the resin, and the pops of gold foil and glitter add a bit of sparkling fall magic that you can enjoy all year long.
As always, I would love to see your creations! Leave me a comment and let me know, or tag a photo on Facebook, Twitter, or Instagram! #AFMcrafts!
Looking for more fall inspiration?
Check out this collection of OVER 100 creative fall craft ideas!!

Don't forget to Pin, Like, and Share!


These are AWESOME Lindsay! I always try to save Fall leaves but they dry out and crumble, I'll have to get your secret for saving them!
ReplyDeleteThe tips to make the leaves completely dried are awesome! Definitely gonna try them. Thanks!
ReplyDeleteMy favorite thing about fall are the beautiful leaf colors, especially the reds and golds! This project will preserve the leaves for a long time. I just have to wait for them to turn and get out there and pick them off the trees or the ground.
ReplyDelete