Count down the days to Christmas with this colorful DIY Fabric Advent Calendar!

Advent calendars are a tradition in our home. Counting down the days until Christmas build the anticipation and makes the magic of the holidays last throughout the entire month. You can fill the pockets with whatever surprises work for your family: treats, activity ideas, quotes or scriptures, and even little toys. This DIY Fabric Advent Calendar is the first one I've ever sewn. It was a lot of fun to make, and I am excited to put it up with my other Christmas decorations!
Supplies:
2 yards back fabric
1 yard pocket fabric
1/2 yard pocket accent fabric
Deco Foil Transfer Sheets - I used Rose Gold, Green, Purple, Aqua, Silver, and Pink Melon
Cricut Maker machine
Sewing Machine, pins, thread, etc.
Iron or Cricut EasyPress

Line up the fabric pieces right sides together and sew all the way around with a 1/4" seam allowance. Leave a 3 inch opening. Cut the corners at an angle, being careful not to cut through the seams. Turn the fabric right side out and poke the corners through so they are nice and pointy. Fold in the opening, and do a topstitch all the way around. Now the backing is ready to go!


For the numbers on the pockets, I wanted to try something new. Deco Foil Hot Melt Adhesive is a heat-activated adhesive that is paired with Deco Foil Transfer Sheets to get that gorgeous foiled finish on both fabric AND paper. You can even cut your own designs with it using punches, die cutters and electronic cutters!


Peel the foil transfer sheet away from the fabric, and voila! Repeat the foiling process for all 24 pockets. You can make any kind of color patterns you want. This really is so easy and a lot of fun. I'm excited to try foiling more fabric projects in the future!

Now the advent calendar is complete! I plan on folding the top edge over about an inch and adding a dowel to hang it up a little easier, but it's definitely useable as-is at this point. I'm in love with this project and can't wait to see it with all of my other holiday decorations soon!


To make the pockets, you need four rectangles that will be split into six pockets each. For the pocket strips, cut four pieces each:
Pocket Accent Fabric 21.5" x 1"
Front Pocket Fabric 21.5" x 3.5"
Back Pocket Fabric 21.5" x 4"

To make the front of the pocket strips, line the front pocket piece with the accent piece, wrong sides together. Sew them together with a 1/4" seam allowance. Press the seams so that they go against the accent fabric - otherwise you will be able to see them through the white fabric.
Repeat for all four pocket strips.

Line up the front and back pocket pieces wrong sides together and sew all the way around, but leave a 2 inch opening so you can flip it. Cut the corners, being careful not to cut through the seam. Flip the pocket strip right side out and poke the corners out. Press it well with an iron. Repeat for all four pocket strips.

Now that everything has been prepped, we can assemble the advent calendar! You should have a back piece measuring 24" x 21.5" and four pocket strips measuring 21.5" x 3.5".

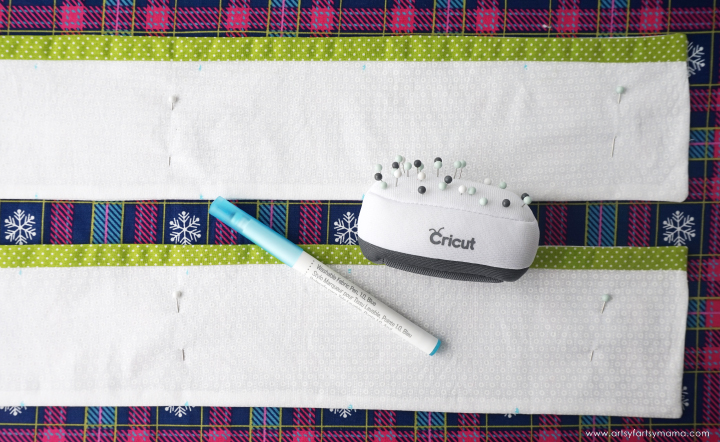
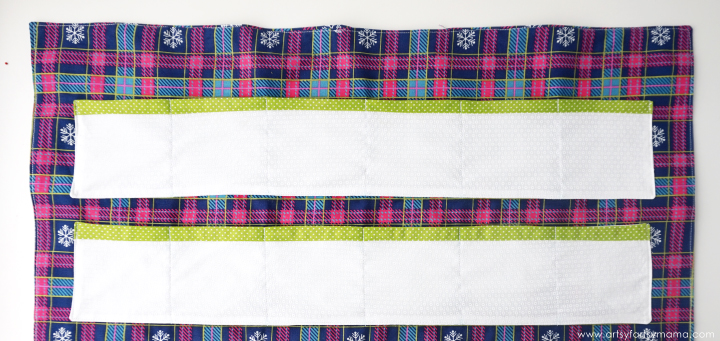
Starting at the bottom, line up the pocket strip so that it is 1.5" away from each side and the bottom. Pin in place. Measure up one inch, and pin the next pocket strip in place, and repeat for the next two pocket strips.
Use a Washable Fabric Pen to mark every 3.5" at the top and bottom of each pocket strip. These will be the guides to create the six separate pockets.

Start at one end of a pocket and topstitch all the way around the sides and bottom of the pocket strips. Then sew top to bottom at each of the Washable Fabric Pen marks. Repeat for all four of the pocket strips.
Use some water and a cloth to remove any of the pen marks from the fabric. Iron the advent calendar afterward if needed.


I've put together an Advent Numbers cut file that you are free to use in Design Space if you'd like to make your own advent calendar. If not, make sure your numbers are no more than 2" high and are a thicker font for best results. Before you cut, make sure you also mirror your image!

The Deco Foil Hot Melt Adhesive sheets measure 12" x 5.5", so they fit perfectly on the mat. Place the sheet with the adhesive/rough side up. I cut using the "Transfer Tape" setting on the Cricut Maker and it worked beautifully.

Carefully remove the numbers off the mat. Center the adhesive numbers in the center of each pocket with the adhesive/rough side down.

Preheat the iron to medium heat with no steam. Place the included parchment paper down and press the iron down over the numbers for 30 seconds. Let the adhesive cool completely, and then you can peel up the liner to reveal the adhesive bonded to the fabric underneath.

Deco Foil Transfer Sheets are the key to getting the foiled finish. There are lots of gorgeous colors to choose from. You can use anything you want! I went with bright colors to match my fabric: Rose Gold, Green, Purple, Aqua, Silver, and Pink Melon.

Cut a piece of foil a little larger than the number. Place it color-side up and cover it with the parchment paper. Press with the iron for 30-40 seconds. Remove the parchment paper (not the foil) and let it cool completely.


Now the advent calendar is complete! I plan on folding the top edge over about an inch and adding a dowel to hang it up a little easier, but it's definitely useable as-is at this point. I'm in love with this project and can't wait to see it with all of my other holiday decorations soon!

The pockets are roomy and will fit all kinds of fun items. A few ideas are stickers, small toys, notes, quotes or scriptures, or anything that brings the Christmas magic into your home!
What would you add to your advent calendar?


I love to put all kinds of treats or little toys, and sometime throw in a coupon for something fun to do!
ReplyDeleteCandy of course, its Christmas and you must have candy. Joanrob8@aol.com
ReplyDelete